What Make-Up Do You Really Need & How To Use It
Since getting a good wifi line at home I have become even more addicted to Youtube beauty vlogging – I have learnt so much through watching various channels over the last few years and enjoyed experimenting with my make up as a result. As you can probably imagine, my make up collection is rather vast but, in actual fact, I am by no means a big make up ‘wearer’. I am much more into my skin care. Maybe that’s because I feel much more knowledgable and confident in this. Make up still really excites me though and I do spend a ridiculous amount of my salary on this (sadly), but it so often is left unused because I am sucked into a sale through great advertising, a good review or a new launch, yet pretty clueless when it comes to actually using the product at home. So my mission has been to learn, play and start wearing these products.
Below are some tricks I have learnt along the way, these are snapshots of different products, what they do and how you should use them. Hopefully it will help you to understand whether you need it in your make up bag and if so, how you should be using it 🙂 I want to keep this post brand-free, but should you want recommendations of what I enjoy, I will happily assist. First things first, I can’t tell you important good brushes are. Yes, they are a bit pricey but they improve your make up application drastically! If you are using that piddly brush you got for free with your blush or that foam applicator in your eye-shadow quad then please listen up (and throw it away at the same time)! There is no need to go and splurge on an entire brush set here, but try get a few good basics and you can slowly build on this: A Blush Brush (Blush) A Blending Brush (Eye-Shadow) A Buffing Brush (foundation) These are examples of what these brushes would look like:
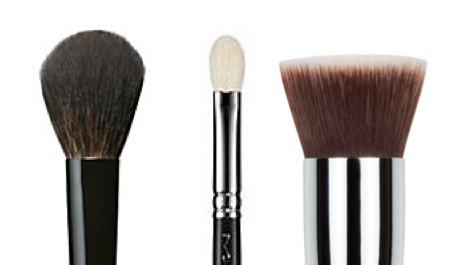 |
| From left: Blush, Eye Shadow, Foundation |
Right, with that out the way, let’s get onto make up 🙂

Who needs this?
Everyone needs some sort of coverage to even out the skin tone – this can be a foundation, BB Cream, Tinted Moisturiser or you could just opt for a concealer (see below) to cover any uneven colour or blemishes.
How to use it?
Either a fluffy foundation brush (like the one pictured above) or your hands. Both work really well. I find a brush works best for fuller coverage so I tend to opt for this when I am doing a fuller face of make up. Hands are perfect for BB Creams and Tinted moisturiser; they warm up the product well.
*Little Tip: If you want flawless, long-lasting foundation you should invest in a good primer. This is applied after your moisturiser and helps keep your make up in place as well as last longer.

Who needs this?
Everyone. A concealer is great for quickly covering up dark circles under the eyes and any redness (which we usually have around the nose area, on blemishes and on the chin area). It gives a fuller coverage and can be used on it’s own for a fresh look. This product is vital as we all could do with something to liven up the tired, discoloured parts of our skin.
How to use it?
Fingers work perfectly well, and the body heat does wonders in working this into the skin. I have recently started using a foundation brush that I swear by, The others I have used in the past have made finger-application much better, but a fluffy concealer brushes reaches all the little crevices that we so often miss out and assures no streaks or cakiness.

Who needs this?
Someone who wants to add warmth and extra colour to their face.
How to use it?
This can be dusted lightly over the face after your foundation is complete. This should be put on the areas that the natural sun would hit – hair line, bridge of your nose, cheek bones and temples. For those who want to contour, a good bronzer is necessary.

Who needs this?
Everyone. Blush is my lifesaver and can cheer any face up! This adds a rosey colour to the face and makes your skin look fresh, alive and feminine.
How to use it?
It is important to find a colour that suits your skin tone (you can watch this video for guidance). You can also choose which consistency you like – there are cream blushes and powder ones – both great depending on what you are looking for. If you are a beginner, go for a powder first as cream blushers need a good stippling brush for application.

Who needs this?
Someone with a more oily skin type or someone who is going to be photographed/needs their make up to last well. A translucent powders helps rid the face of excessive shine so should generally be applied to the T-Zone area. Don’t over-use this as you still want your skin to have a radiant glow.
How to use it?
You can use a big fluffy brush here. If you don’t have one, use your clean Blush brush. A little goes a long way with this product, so rather use less and add should you need more. I don’t really like using a powder unless it is really necessary.

Who needs this?
Eyebrows frame our face. You wont believe the difference this product will make to your face, so most definitely everyone needs an eyebrow product of sorts.
How to use it?
Their are a number of products you can use for filling in your brows, just make sure they never look drawn on! Use light, flicking movements, focusing on the arch and areas that have sparse hair. Again, less is more – rather build up colour that go too full-on! A powder, pencil or gel can be used – they all great so up to you, just be sure to get a colour that suits you well.

Who needs this?
Anyone, if you feel you want to wear shadow. It adds nice depth to the eye area and can accentuate your eyes, drawing attention to them.
How to use it?
Use your blending eye-shadow brush and always start with a neutral, lighter shade all over the eye lid. You can then start working with a darker colour in the eye lid crease to add depth. The only way to learn here is practice, practice, practice. Once you find colours that suit your skin tone and eyes you will never look back!

Who needs this?
Eyeliner can be used to add drama to the eyes or simply accentuate this area.
How to use it?
Liner can be used in so many ways – from liquid liners for a cat eye to pencils in the water-line. Find what works best for you and, more importantly, your eye shape. Note that not every make up look on the eyes looks good on all eye shapes – find one that opens your eyes up and sometimes no liner is best for this.

Who needs this?
Who doesn’t!?!
How to use it?
I won’t state the obvious here, but I will say that using lash curlers before application works wonders in opening the eye area up – I use these daily. Also, if you are using one coat of mascara you are wasting your time, build it up, ladies!

Who needs this?
Everyone needs some sort of lip product – whether it’s a pretty balm or a full on lipstick.
How to use it?
If you are using a full on lip colour it’s best to line the lips with a matching lip liner. I actually prefer colouring the whole lip in with a lip liner – it prevents bad fading and colour bleeding. You can then apply your lipstick and blot with a tissue, then repeat. Your colour will last beautifully this way! Add a touch of gloss to the centre of the lip to create fullness or simply add a touch of highlighter to the cupids bow and lower lip-centre – this helps catch the light.


Absolutely wonderful post! Love all the tips and info
Thanks Charlene 🙂 x
Love this post, so much useful information 🙂
Thanks Laura-Jane 🙂 Glad it's helpful x
Thanks for this, very useful 🙂 What would you recommend as the best eyebrow product to fill in and darken? Also, what is your absolute best mascara?
Hi! I really want to do more with my eyebrows but not sure where to start – I am naturallly brunette and have dark, dark eyebrows but I have my hair highlighted to a light blonde. My eyebrows obviously already stand out quite a lot. I keep them shaped and neat with waxes/threading but I want to make more of them as it really changes the whole look of my face. All the products I've seen seem to be for either blondes or quite a light brunette and I'm not sure if this means I must look elsewhere or the light brunette? It's much lighter than my natural eyebrows and I'm not sure if I must go for a gel/pencil/powder? Any help would be appreciated!
Hi Candice, for brows I either use a dark shadow with an angled brush – you can use a disposable spooly brush with hair spray to comb through afterwards, else I am loving the Smashbox Brow Tech, it has the colour on one end and the gel on the other. Lastly, Soap and Glory have Archery pen which is awesome and cheap but only available in UK. Mascara wise I am LOVING the L'oreal False Lash Effect mascara – it took me by surprise, else always love Estee Lauder Sumptuous Extreme or Maybelline Great Lash Mascara. Take a look at L'oreals options though, the one I like is in a silver container and has just got better and better as I've used it 🙂 Hope that helps x
Hi Siobhan, I also have super dark brows so never thought I needed to use anything, but now that I do, it has changed the way my face is framed. Try get a colour as close to your natural brow colour as possible. It's totally up to you what formula you use – my best is the Smashbox Brow Tach in Brunette as it is a crayon-like colour with a gel on the other end, else an eye-shadow in dark brown with an angled brush is great. You generally only need to fill in the brows from the arch to the end – it defines them that much more. If you have a friend who lives overseas then try and get the Soap & Glory Brow Archery in Brownie Points (for brunettes) – it is cheap and works miracles as it has a liquid-like colour that you paint on and is very subtle and then a waxy pencil to keep brows in place. All of the above give a super subtle effect and nothing too drawn on or fake. Shout if you need more help 🙂
That is so much help, thank you so much! I'm actually heading to the UK at the beginning of November, so maybe I'll buy a couple of those Soap and Glory sets 🙂
Definitely do that then 🙂 Not as dark as the Smashbox one, but you can build up the colour and very easy to use. Enjoy!